主要是要測試 http://tohtml.com/
效果好像真的不錯優~
#!/usr/bin/python
# -*- coding: utf-8 -*-

import win32gui
import time

while (True):
    x,y = win32gui.GetCursorPos()
    time.sleep(0.2)
    print x,y
#-*- coding: utf-8 -*-

#!/usr/bin/python


import thread

import time


def Threadfun(string, sleeptime, *args):

        while(True):

                print '{0}_{1}\n'.format(string, sleeptime)

                time.sleep(sleeptime)


if __name__ == "__main__":

        for i in range(1,5):

                thread.start_new_thread(Threadfun, ("ThreadFun", i))

        while(True):

        print 'MainThread {0}'.format(thread.get_ident())

time.sleep(1)#-*- coding: utf-8 -*-
#!/usr/bin/python
import thread
import time
def Threadfun(string, sleeptime, lock, *args):
while(True):
print 'Enter_{0}\r\n'.format(string)
time.sleep(sleeptime)
print 'Leave_{0}\r\n'.format(string)
if __name__ == "__main__":
lock = thread.allocate_lock()
thread.start_new_thread(Threadfun, ("ThreadFun1", 2, lock))
thread.start_new_thread(Threadfun, ("ThreadFun2", 2, lock))
while (True):
pass#-*- coding: utf-8 -*-
#!/usr/bin/python
import thread
import time
def Threadfun(string, sleeptime, lock, *args):
while(True):
lock.acquire()
print 'Enter_{0}\r\n'.format(string)
time.sleep(sleeptime)
print 'Leave_{0}\r\n'.format(string)
lock.release()
if __name__ == "__main__":
lock = thread.allocate_lock()
thread.start_new_thread(Threadfun, ("ThreadFun1", 2, lock))
thread.start_new_thread(Threadfun, ("ThreadFun2", 2, lock))
while (True):
pass#-*- coding: utf-8 -*-
#!/usr/bin/python
from threading import Thread
import time
class MyThread(Thread):
def __init__(self, string, sleeptime):
Thread.__init__(self)
self.sleeptime = sleeptime
self.setName(str(sleeptime))
def run(self):
while(True):
print 'Threadfun_{0}\r\n'.format(self.getName())
time.sleep(self.sleeptime)
if __name__ == "__main__":
thrList = [MyThread('ThreadFun', i) for i in range(1,5)]
# thrList[0]~thrList[3]
for i in range(0,4):
thrList[i].start()
# another way
#for i in range(1,5):
# MyThread('ThreadFun', i).start()#!/usr/bin/python # -*- coding:utf-8 -*- from threading import * import time class itemX: def __init__(self): self.cnt = 0 def produce(self, num=1): self.cnt += 1 def consume(self, num=1): if self.cnt: self.cnt -= 1 else: print 'WARNING***********************WARNING' def isEmpty(self): return not self.cnt def getCount(self): return self.cnt class Producer(Thread): def __init__(self, condition, item, sleeptime=2): Thread.__init__(self) self.con = condition self.item = item self.sleeptime = sleeptime def run(self): while (True): time.sleep(self.sleeptime) self.con.acquire() self.item.produce() print 'produce 1 product\r\n' print self.item.getCount() self.con.notifyAll() self.con.release() class Consumer(Thread): def __init__(self, condition, item, sleeptime=2): Thread.__init__(self) self.con = condition self.item = item self.sleeptime = sleeptime def run(self): while (True): time.sleep(self.sleeptime) self.con.acquire() print '({0})enter'.format(self.getName()) while self.item.isEmpty(): print '({0})wait'.format(self.getName()) self.con.wait() self.item.consume() print '({0})consume 1 product\r\n'.format(self.getName()) print self.item.getCount() self.con.release() if __name__ == "__main__": X = itemX() cond = Condition() Producer(cond, X).start() Consumer(cond, X).start() Consumer(cond, X).start() while (True): pass
#!/usr/bin/python

# -*- coding:utf-8 -*-


from threading import *

import time


class itemX:

     def __init__(self):

        self.cnt = 0


    def produce(self, num=1):

        self.cnt += 1


    def consume(self, num=1):

        if self.cnt:

            self.cnt -= 1

        else:

            print 'WARNING***********************WARNING'


    def isEmpty(self):

        return not self.cnt


    def getCount(self):

        return self.cnt


class Producer(Thread):

    def __init__(self, condition, event, item, sleeptime=1):

        Thread.__init__(self)

        self.con = condition

        self.event = event

        self.item = item

        self.sleeptime = sleeptime


    def run(self):

        while (True):

            time.sleep(self.sleeptime)

            self.con.acquire()

            self.item.produce()

            print 'produce 1 product, remain({0})\r\n'.format(self.item.getCount())

            self.event.set()

            self.con.release()


class Consumer(Thread):

    def __init__(self, condition, event, item, sleeptime=1):

        Thread.__init__(self)

        self.con = condition

        self.event = event

        self.item = item

        self.sleeptime = sleeptime

    def run(self):

        while (True):

            time.sleep(self.sleeptime)

            self.con.acquire()

            print '({0})enter\r\n'.format(self.getName())

            #while self.item.isEmpty():

            while (True):

                print '({0})wait'.format(self.getName())

                self.event.wait()

                break

            self.item.consume()

            self.event.clear()

            print '({0})consume 1 product, remain({1})\r\n'.format(self.getName(), self.item.getCount())

            self.con.release()


if __name__ == "__main__":

    X = itemX()

    cond_Con = Condition()

    cond_Pro = Condition()

    event = Event()

    Producer(cond_Pro, event, X).start()

    Consumer(cond_Con, event, X).start()

    Consumer(cond_Con, event, X).start()


     while (True):

pass #-*- coding: utf-8 -*-
#!/usr/bin/python
from threading import Time
def hello(msg):
print msg
t = Timer(3, hello, ['Hello world'])
t.start()
#!/usr/bin/python

#-*- coding:utf-8 -*-


from threading import *

import Queue

import time


class MyThread(Thread):

     def __init__(self, condition):

          Thread.__init__(self)

        self.cond = condition


     def run(self):

        print '{0} start\r\n'.format(self.getName())

        global cnt

        while (True):

            id = threadPool.get()

            if id != None:

            self.cond.acquire()

            print '{0}_{1}'.format(self.getName(), id)

            for x in xrange(101):

               cnt += x

               time.sleep(2)

            print 'cnt = {0}\r\n'.format(cnt)

            cnt = 0

            self.cond.release()

            threadPool.task_done()


threadPool = Queue.Queue(0)

condition = Condition()

cnt = 0

for i in xrange(2):

     MyThread(condition).start()


for i in xrange(10):

    threadPool.put(i)


threadPool.join()

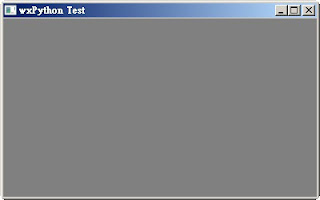
print 'done'#-*- coding: utf-8 -*- #!/usr/bin/python import wx if __name__ == "__main__": app = wx.App() frame = wx.Frame(None, -1, 'wxPython Test') frame.Show() app.MainLoop()沒看錯,真的十行有找。

#-*- coding: utf-8 -*-
#!/usr/bin/python

import wx

class myFrame(wx.Frame):
    def __init__(self, parent, id, title):
        wx.Frame.__init__(self, parent, id, title, (400,300))
        self.Show()
if __name__ == "__main__":
    app = wx.App()
    frame = myFrame(None, -1, 'wxPython Test')
    app.MainLoop()
執行的結果跟上面是一樣的。
#!/usr/bin/python
# -*- coding: utf-8 -*-
import wx

class myFrame(wx.Frame):
    def __init__(self, parent, id, title):
        wx.Frame.__init__(self, parent, id, title, (400,300))

        menubar = wx.MenuBar()

        file = wx.Menu()
        file.Append(1, 'New', 'New a file')
        file.Append(1, 'Quit', 'Quit application')

        edit = wx.Menu()
        edit.Append(3, 'Copy', 'Copy')
        edit.Append(4, 'Paste', 'Paste')

        menubar.Append(file, '&File')
        menubar.Append(edit, '&Edit')
        self.SetMenuBar(menubar)

        self.Centre()
        self.Show()

if __name__ == "__main__":
    app = wx.App()
    frame = myFrame(None, -1, 'wxPython Test')
    app.MainLoop()
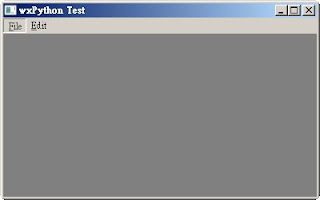
首先要先建立一個 MenuBar 物件,

#!/usr/bin/python
# -*- coding: utf-8 -*-
import wx

class myFrame(wx.Frame):
    def __init__(self, parent, id, title):
        wx.Frame.__init__(self, parent, id, title, (400,300))

        menubar = wx.MenuBar(wx.MB_DOCKABLE)

        file = wx.Menu()
        file.Append(1, 'New', 'New a file')
        file.Append(1, 'Quit', 'Quit application')

        edit = wx.Menu()
        edit.Append(3, 'Copy', 'Copy')
        edit.Append(4, 'Paste', 'Paste')

        menubar.Append(file, '&File')
        menubar.Append(edit, '&Edit')
        self.SetMenuBar(menubar)

        # Bind menu with an event
        self.Bind(wx.EVT_MENU, self.OnQuit, id=2)

        self.Centre()
        self.Show()

    def OnQuit(self, event):
        self.Close()

if __name__ == "__main__":
    app = wx.App()
    frame = myFrame(None, -1, 'wxPython Test')
    app.MainLoop()
注意 bind 的地方跟 OnQuit 這個 method 就是響應 menu 這個 event。
#-*- coding: utf-8 -*-
#!/usr/bin/python

import wx

class MyPopupMenu(wx.Menu):
    def __init__(self, parent):
        wx.Menu.__init__(self)

        self.parent = parent

        minimize = wx.MenuItem(self, wx.NewId(), 'Minimize')
        self.AppendItem(minimize)
        self.Bind(wx.EVT_MENU, self.OnMinimize, id=minimize.GetId())

        close = wx.MenuItem(self, wx.NewId(), 'Close')
        self.AppendItem(close)
        self.Bind(wx.EVT_MENU, self.OnClose, id=close.GetId())

    def OnMinimize(self, event):
        self.parent.Iconize()

    def OnClose(self, event):
        self.parent.Close()


class myFrame(wx.Frame):
    def __init__(self, parent, id, title):
        wx.Frame.__init__(self, parent, id, title, (400,300))

        menubar = wx.MenuBar(wx.MB_DOCKABLE)

        file = wx.Menu()
        file.Append(1, 'New', 'New a file')
        file.Append(2, 'Quit', 'Quit application')

        edit = wx.Menu()
        edit.Append(3, 'Copy', 'Copy')
        edit.Append(4, 'Paste', 'Paste')

        menubar.Append(file, '&File')
        menubar.Append(edit, '&Edit')
        menubar.Append(MyPopupMenu(self), 'pop')
        self.SetMenuBar(menubar)

        #Bind menu with an event
        self.Bind(wx.EVT_MENU, self.OnQuit, id=2)

        #Bind right-button down event
        self.Bind(wx.EVT_RIGHT_DOWN, self.OnRightBtnDown)

        self.Centre()
        self.Show()

    def OnRightBtnDown(self, event):
        self.PopupMenu(MyPopupMenu(self), event.GetPosition())

    def OnQuit(self, event):
        self.Close()

if __name__ == "__main__":
    app = wx.App()
    frame = myFrame(None, -1, 'wxPython Test')
    app.MainLoop()
有注意到嗎?
def OnRightBtnDown(self, event):
    #self.PopupMenu(MyPopupMenu(self), event.GetPosition())
    self.Bind(wx.EVT_MENU, self.OnTest, id=5)
    test = wx.Menu()
    test.Append(5, 'test', 'test')
    self.PopupMenu(test, event.GetPosition())

def OnTest(self, event):
    self.Close()
#!/usr/bin/python

# Filename: total.py

def total(initial=5, *numbers, **keywords):

    count = initial

    for number in numbers:

        count += number

    for key in keywords:

        count += keywords[key]

    return count


print(total(10, 1, 2, 3, vegetables=50, fruits=100))zoo = ('python', 'elephant', 'penguin')# 空的tuple:
myempty = ()
# 只有一個元素的tuple:
singleton = (2, )age = 25
name = 'Swaroop'
print('{0} is {1} years old'.format(name, age))
print('Why is {0} playing with that python?'.format(name))>>> '{0:.3}'.format(1/3) # decimal (.) precision of 3 for float
'0.333'
>>> '{0:_^11}'.format('hello') # fill with underscores (_) with the text
centered (^) to 11 width
'___hello___'
>>> '{name} wrote {book}'.format(name='Swaroop', book='A Byte of Python')
# keyword-based
'Swaroop wrote A Byte of Python'def howMany():
'''Prints the current population.'''
print('We have {0:d} robots.'.format(Robot.population))
howMany = staticmethod(howMany)@staticmethod
def howMany():
'''Prints the current population.'''
print('We have {0:d} robots.'.format(Robot.population))#!/usr/bin/python
# Filename: pickling.py
import pickle
# the name of the file where we will store the object
shoplistfile = 'shoplist.data'
# the list of things to buy
shoplist = ['apple', 'mango', 'carrot']
# Write to the file
f = open(shoplistfile, 'wb')
pickle.dump(shoplist, f) # dump the object to a file
f.close()
del shoplist # destroy the shoplist variable
# Read back from the storage
f = open(shoplistfile, 'rb')
storedlist = pickle.load(f) # load the object from the file
print(storedlist)#!/usr/bin/python
# Filename: use_logging.py
import os, platform, logging
if platform.platform().startswith('Windows'):
logging_file = os.path.join(os.getenv('HOMEDRIVE'),
os.getenv('HOMEPATH'), 'test.log')
else:
logging_file = os.path.join(os.getenv('HOME'), 'test.log')
logging.basicConfig(level=logging.DEBUG,
format='%(asctime)s : %(levelname)s : %(message)s',
filename = logging_file,
filemode = 'w',
)
logging.debug("Start of the program")
logging.info("Doing something")
logging.warning("Dying now")listone = [2, 3, 4]
listtwo = [2*i for i in listone if i > 2]
print(listtwo)